
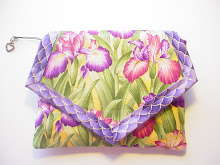
 Isn't she cute. I love this bag. I use one and I have to say it is perfect for going out to dinner. I hate caring my big bag so this is perfect. I place my cell, I carry a LG Incite, my credit cards, drivers licence a little cash, lip stick. My hubby carries the car keys. Get your machine ready you are going to want to make bunches of these.
  Melyenda is a draw string wristlet with a round flat bottom. She measure approximately 3" across and about 11" high.
 Here is a view of the inside.
 CUT AND SUPPLY LIST FOR MELYNDA:
1. You will need 2 panels 1 of fabric body cut 12 1/4" x 9" and 1 for the lining 12 1/4" x 9"
1. You will need 2 panels 1 of fabric body cut 12 1/4" x 9" and 1 for the lining 12 1/4" x 9"
2. Cut 2 of light weight fusible interfacing 12 1/4" x 9"
3. 2 strips of double fold bias tape store purchase, each cut at 25" long (If you do not want to use bias, you can use cording or ribbon.)
4. Plastic insert for bottom of bag for support, cut 1/2" smaller then the pattern supplied.
5. For draw string casing cut 2 strips of fabric,1 1/2" x 6"
6. 2 circles cut one for bag body and one for lining 4" in diamater, or 2" radius
CONSTRUCTION:
1. You will need the cut 1 circle for the bag body 4" in diamater or 2" radius.
2. Using your cut panels, please fuse the interfacing to the wrong side of the bag body and the lining panels.
3. Using the bag body panel fold in half long wise right sides facing each other and sew the short side using a 3/8" seam allowance.
4. With the panel remaining wrong side facing you, evenly distribute the bottom edge of the panel lining up the raw edges of the circle and bottom edge, pin to secure. Be sure the right sides are facing each other, bag body panel and bag bottom. See image below.
 Sew in place using a 3/8" seam allowance. Turn right side facing you, press your bottom flat and seams.
LINING CONSTRUCTION:
1. Use the same instructions for the bag body to make the lining, excluding turning right side facing you.
1. Use the same instructions for the bag body to make the lining, excluding turning right side facing you.
HANDLE CONSTRUCTION:
1. Using the cut Bias tape, sew them closed by using a single machine stitch up the center of the Bias tape.
1. Using the cut Bias tape, sew them closed by using a single machine stitch up the center of the Bias tape.
2. Tie your ends. Set aside for later.
COMPLETION OF WRISTLET:
COMPLETION OF WRISTLET:
CASING CONSTRUCTION:
1. Using your cut panels for the draw string casing. With wrong side facing you, press each long raw edge in towards the center of the casing.
1. Using your cut panels for the draw string casing. With wrong side facing you, press each long raw edge in towards the center of the casing.
2. Next fold each press each short end of the casing 1/2" towards the center.
3. Using the bag body, center the casing on one side of the bag 2" from the top. Pin in place.
 4. Once complete press the top edge of the lining and bag body top edge 1/2", press facing wrong side of the fabric.
5. Slip lining inside the bag, line your pressed edge and the side sewn seam. Pin to secure.
6. Sew in place using a 3/8" seam allowance.
7. Using a safety pin attach to end of your binding slip into the right cavity casing and come out of the other casing right side, till ends meet each other. Slip knot those ends together. Using the other Bias tape attach safety pin and insert on the left side of the first casing you went through, then come out through the other left side casing meeting the ends. Slip knot those together. You now have handles on each side, right and left. Pull tie to close bag.
Bag Complete.
She really is fun to make and quick. Send me pictures of your bags I would love to see them and use them in my news letter. jackie1stb@yahoo.com
For a printable version of this pattern please click here: http://www.jackiesdesighns.com/accessorypatterns.html
This pattern is under copyright of Jackie's Desighns Posh Pattern so please respect them Thank you.
To view the copy right please click here: http://www.jackiesdesighns.com/aboutthedesigner.html


No comments:
Post a Comment